Ruby Laine Make-Up & Special FX Lesson
14:35:00Happy Monday everyone!
I dunno about you but I was not overly impressed when my alarm started going off so early this morning. I was just getting used to once again waking up late and loving the lie ins but yet here we are back to the grindstone.
Over Christmas my blogging was not the best but I do hope you'll forgive me as it's the festive season and I have a lot of Harry Potter to be watching and spending some much needed time with my friends. I am feeling refreshed in the blogging sense, there is so much happening in the coming weeks I am quitely confident you will be happy with all the new posts, lots of lessons and also an insiders view to my makeup course in Inglot beginning the 14th of this moonth.
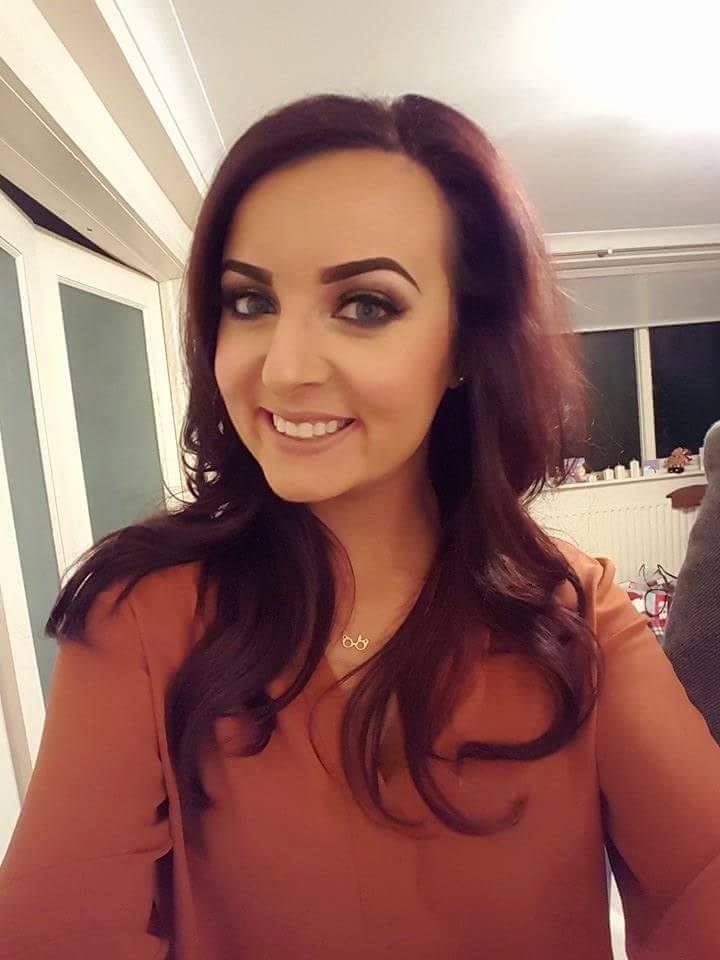
Anyway.... back to business, On Sunday the 29th of Dec I ventured along the M50 to visit Ruby Laine Make-Up & Special FX.Check out her website here http://rubylainemakeup.com/ It was a cold morning but I was raring to go. Ruby Laine 'Elaine' is a fellow blogger and we had linked in through twitter when I sent out a post if any bloggers wanted to feature here on my blog by helping me with lessons. Ruby Laine so kindly offered her services free of charge which was great with Christmas coming so close. We had pencilled in an earlier date but I was really under the weather with a migraine so we postponed a week or two.
When we had discussed the lesson, I explained that I wanted a look that was easy to create but looks amazing. We chose a feature to work on and what better than a smokey eye with hint of glitter in time for new years. Glitter is not something that can only be used at Christmas, I think people just go that extra bit funky with glitter as they do with bright coloured lippies in the summer months. This was to be a very interactive lesson for me as Elaine had dislocated her shoulder so there was a lot of explaining and I completed the look with a little help, so if I can master the black... so can you!!
I was in awe looking at the amount of products which were surrounding me, I can't help it any time I see something I don't already own I just want it!
We decided to use as many of the products as I already owned as possible and then a few extras. So ladies this smokey eye look only needed 2-3 brushes, minimal expertise but a little patience and perseverance and you'll get there :)

We firstly applied a black pencil eye liner to my liner, very messy, very uneven but do start at the lash time and work up from there. Any kohl liner will do here, there are great liners out there from Catrice, Rimmel and then the usuals of MAC and Urban Decay. Taking a clean big fluffy brush, you then blend out the black liner all over the lid and up into the crease. Not too high that you hit your brow bone but up to the crease in your eye. Work the brush is circle motions to help the blending and take your time. You will see it creates a matte effect on your eye. Ruby Laine explained, when you apply liner to the lid and blend it out, it intensifies any colour you then put on top of it.
We chose a navy eye shadow to sit on top of the black. Ruby Laine had a beautiful L'oreal colour from what I remember but I know I have a very similar colours from both Inglot and Urban decay. For great palette ideas be sure to check out Sleek, they have fantastic colours. I know what you are thinking, navy on black? But yes! It creates a beautiful shadow behind the navy colour. Firstly apply this to the lid using a small flat brush and then buff it all out with another blending brush. As I recently posted, I have invested in some new Crown Brushes and on the day we used other Crown Brushes which I will attach the link to. One was sold out when I went to order it after the lesson so I will deffo get it in the coming weeks.
Once you have blended the colour up you will already see how smokey it looks. You can go back in with your navy to strengthen the colour if you wish or if you wanted to smoke out the eye even more, you could add a darker colour such as black into the outer corner of the eye. I wanted to keep this look as simple as possible as I already feel I'm dodgy when it comes to black... sometimes I feel when I add liner to looks like this, I look like I have been punched in the face! Bad times! :(
I did however add a lovely white/cream shadow to my brow bone as a highlight. Ladies this is really essential, it can brighten the eye, give more shape to the brows and open your eyes so please don't forget this step. You'll find no matter what colour palette you get, there is usually a colour which can be used as a highlight so keep an eye out.
That is pretty much the top of your eye done before the glitter. Just to note, this look is not only for a navy blue colour, you could add any dark colour onto your lid using the liner as a sort of primer so that's why we chose this, it's completely versatile and once you get the hang of the blending as high or a dark as you would like you can create loads of different looks using the same basics and same brushes.
If you want to add glitter to this, choose a fine glitter, you don't want something too clumpy as it can build up on your eyelid. I had recently attended an Inglot masterclass and purchased a product called duraline. This can be used almost like a glue to set glitter onto the eye but when looking at the set we had, we didn't need the duraline. This blue/lilac coloured glitter was from a set Ruby Laine picked up in a Boots sale which I hve kept my eye out for but still not found, it's called front cover so if any of you see one please do let me know. :) Line your top lash line with either gel/ liquid which ever is easiest for you. We used a beautiful Catrice marker liner which had a great colour and was much easier to use then the liquid I had brought with me. I found the liner was easier to draw, I kept it small and tight into my lash line.
Apply your false lashes in whatever way you feel most comfortable. I am doing them years at this stage and yet still struggle so much, I am trying now to look down and use a tweezers but I find my fingers always work best, just be sure not to stick yourself to yourself. Girls please please be careful with glue for lashes. Ever since I started using the DUO Glue I couldn't dare use anything else, it may not smell the greatest but is so safe and dries clear so never runs your look. Do not use cheap glue on your eyes, you never can be too sure. You can buy DUO Glue from Cloud 10 Beauty for around €10. It's a very wise investment I promise!
Lash on the mascara to bind your own lashes to the falsies and then onto your bottom lash line. Go back in with the liner on the lash line if you need to. If like me, you are not overly confident on your eye makeup, be sure to do your eyes first, after all, if there is fall off it's no worries to you as your face it nice and clean. You can sweep off any excess product from your face with a little cleanser and a cotton swab. As there is no glitter going onto your bottom lash, now would be a good time to apply your foundation/ under eye concealer and then finish.
For the bottom lash line, you take your navy colour brush and lightly colour in your under eye, making sure to blend right over to the outer corner. Then go back in with your pencil liner into the waterline if you can. I find that when a pencil is too sharp it can really hurt my eyes so just keep an eye on that, you don't want to make yourself all teary eyed.

This was the easy peasy breakdown of how to create a beautiful smokey eye. I know we made it sound so simple but ladies, with a few practice runs you'll have a smokey eye in 10 mins ready to rock any day. So just to go over the plan:
- Bare face
- Pencil liner on lid
- Blend out liner with fat fluffy brush
- Add pop of colour (in this case navy)
- Blend out colour up to crease with new fluffy brush
- Add glitter with flat brush
- Add gel/liquid liner
- Apply falsh lashes
- Apply mascara
- Go back over liner on top lashes
- Clear away any product on face
- Apply foundation
- Apply under eye concealer
- Blend navy colour under eye
- Apply pencil liner into bottom lash line
- Smile you're beautiful oh and finish the rest of your face!!


0 comments